Monday 30 January 2017

Battle Report #18 - Butcher3 vs Haley2

January 29, 2017
Scenario: Recon
Opponent: Greg S
Initiative: Greg

Butcher3
Wardog
Ruin
Marauder
Min Uhlans
Min Uhlans
Eliminators
Eliminators
Drakhun
Drakhun
Orin
Kell
Bokur (c:Butcher)

Haley2
Stormclad
Stormclad
Thorn
Squire (Free)
Max Lances
Min Lances
Laddermore
Junior (Free)
Firefly
Min Field Mechanics
THEME: STORM DIVISION


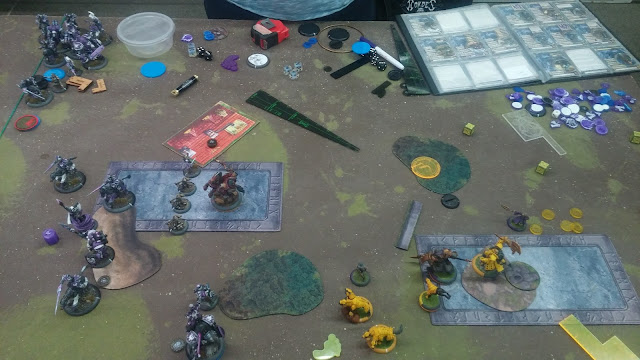
This was the final table of a local 11 man steamroller.  Greg and I are both prepping for the LVO and we have relatively even record against each other so we knew it was going to be a tight game.  Greg felt his Haley3 didn't quite have enough arm cracking to deal with Harkevich as he is my normal Cygnar drop.  However entrenched is a scenario that Butcher loves, and with Orin and Ruin in the list he has some solid tools in the Haleys.  Giddyup.


End of Round 1.  Haley TK's 4 models and everything runs up.  I run up everything as well, trying to keep my forces spread out so Haley can't feat on everything.  While trying to keep Butcher out of feat range and still threatening the zone, I make a stupid mistake and place Ruin outta control.  Kell aims and kills a stormlance.  Not sure why Greg put them so close.


Thorn moves up, dominates the marauder forward which gets killed by Laddermore and a stormclad.  His max lance unit shifts over to cover his zone, knowing Butcher can easily clear and dominate, he doesn't want to put anything with 12" of Butcher in fear of losing too much.  He kills my jamming Uhlan, and the one behind the forest gets killed by eleaps.  Haley doesn't feat.


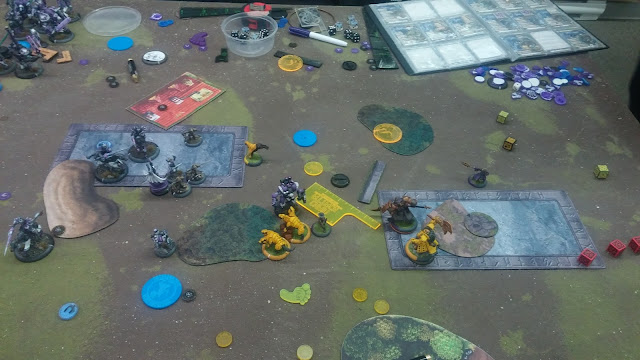
Ruin was out of control.  Stupid stupid mistake.  Kell aims and shoots the stormclad for 6pts.  Only need to do 5pts of damage to column 4 or 5 to take out the cortex now.  I move Butcher into the zone and position with entourage around him.  The drakhun covers most of the zone while staying outside of charge threat range of the lance that can see him.  I send Ruin into the damaged stormclad, but dont hit the right column.  If only I could have allocated to him.  My Uhlans charge his objective, bad dice require 3 of them to kill it, I jam with them and position the drakhun in the corner of the zone.  2-0.

(Missing Picture)

He clears out all my uhlans, puts 7 pts on my left drahun, and TK's him outt the zone.  Haley feats and moves far forward and barely clips the eliminator that I had positioned to run into the zone to contest.  Nothing on my right side is under feat.  He boxes out the zone so after my drakhun kills a lance he can't repo in.  Ruin dies but it takes a stormclad, 2 lances and a firefly charge to bring him down.  Go Ruin.  Everything is just outside of butchers 12" threat.  He runs the mechanic officer in to contest just outside of counter charge range.  2-1.


Kell aims and kills a lance.  With the mechanic in the zone, Butcher has his charge target.  He charges the mechanic pulls in the firefly and stormclad, killing them both.  He feats and energizes behind the wall.  Left flank doesn't do too much and unfortunately I can't contest.  3-2.

(Missing Picture)

Greg mops up the left side but has difficulty contesting.  He runs arcane shields laddermore and runs her into the zone.  She takes a free strike from an argus and a countercharge from my wardog, but she conests. 3-3.


Drakhun charges a lances, hills him and repo's into mechanics and Jr.  Bokur dismounts laddermore, bucher flashing blades her then backs up into the rubble.  I position my guys as so. 4-3

(Missing Picture)

To contest Greg runs Thorn to TK a dog, then TK the stormclad so the stormclad can run into my zone.  With a TK and a charge from haley, the lances and Jr are able to kill my Drakhun.  Greg clocks to me with 1 second left on his clock. 4-4.


All I have to do is kill the stormclad and clock over to him since we would both score to 5 and then he would time out.  Butcher easily kills the stormclad, and my dog is able to run to contest just for good measure.  5-4.  


Oh man this was a great game!  Couple mistakes on both sides, but when is there not?  Butcher is really strong in entrenched and going second (even against H2) probably won me the game, not that it was my choice tho.  The terrain also helped as he didn't have access to pathfinder, which is a problem with the Storm Division.  Although it does allow more beef in the list. 

The double drakhun is great in this list.  The double Uhlans.....I'm not sure about, I've thought about dropping a unit for a Juggernaut, but being able to act outside of 12" from butcher is really good, especially in scenario's like this one or recon.  Anyways, I'm not gonna make any changes this close to the LVO.

Friday 20 January 2017

Battle Report #17 - Butcher3 vs Xerxis2

January 20, 2017
Scenario: Recon
Opponent: Matt R
Initiative: Me


Butcher3
Wardog
Ruin
Marauder
Min Uhlans
Min Uhlans
Eliminators
Eliminators
Drakhun
Drakhun
Orin
Kell
Bokur (c:Butcher)
Xerxis2
Molik Karn
Desert Hydra
Gladiator
Krea
Max Swordsment + UA
Max paingivers 


Our Skorne player is back, and its great to see Skorne on the table.  Hardly ever saw them in mk2 and never played against them in mk3.  Matt hasn't played many games recently and is a little rusty.


End of Round 1.  Camera must not have flashed.  Matt chooses sides but probably chose the wrong side as it made maneuvering 2 huge bases difficult.  He does not have much experience doing this.  I forget to move my left drakhun up.  Damn 2D proxy.


I don't commit much this turn.  Kell aims and kills 2 swordsmen, orin kills 2 and elminators kill two.  Eliminators move up to provide a difficult target for his swordsmen and prevent jamming of my uhlans.  One Uhlan with SoD on it charges molik to get some early damage on him and with any luck, knock him down.  But I fail to roll a 6 for my impact hit. and stop just outside of melee.  Butcher (who is the yellow proxy between the bokur and the 2d Drakhun, stays just outside of the Hydra's massive 14" range.  Ruin and the marauder hide behind the forest just outside of 11" from the hydra. 


With Ruin threatening the Hydra, Matt feels that he should send it in and try to do some good damage at pow 22.  Xerxis feats and clears the uhlan from infront of molik.  The hydra tramples then procedes to buy 3 attacks on ruin.  Ruin survives with 3 boxes, with his right arm and cortex functional.  Uh oh.  Molik charges 15" into my marauder (I should have moved ruin a bit to the left and stayed out of Moliks range).  Matt doesn't jam my drakhun with swordsmen and I get a counter charge on molik, doing 13pts of damage taking out his mind.  Maurader goes down and a huge spike on the objective leaves it on 1.  Swordsmen kill one eliminator.


A fully loaded ruin, 2 drakhuns and a bokur kill the hyrda and the guys on the right side mostly clean up the swordsmen.  Butcher moves onto the flag to score.


 Matt's pretty well boned at this point.  He decides for X2 to shift towards the right and perhaps clear and score that flag, but he comes up short.  Paingivers contest.


Another dark picture.  Middle Uhlans kill objective, flag is cleared and both drakhuns tie up the paingivers.  I go to 3 at the end of this turn and with no way to contest, Matt concedes.


X2 is terrifying with the amount of speed he can bring.  My Butcher list is supposed to be fast but Xerxis puts it to shame!  And its skorne so the amount of damage it can inflict is crazy!  Plus with fate walker Molik is hard to pin down!  So many threats!  So many exclamation points!  I think effectively piece trading with skorne is going to be very important in the matchup.  I feel that with access to the extoller and with how hard skorne hits, Harkevich is probably not great.  Tho perhaps the sheer volume of jacks maybe enough that skorne chokes since their strong beaters tend to be more expensive than khador jacks.  Anyways, for know its Butcher's game.  I'll need to get more practice in vs them because Skorne seem to have a ton of legit casters now.

Battle Report #16 - Butcher3 vs Amon1

January 20, 2017
Scenario: Extraction
Opponent: Bryan T
Initiative: Bryan

Butcher3
Wardog
Ruin
Marauder
Min Uhlans
Min Uhlans
Eliminators
Eliminators
Drakhun
Drakhun
Orin
Kell
Bokur (c:Butcher)

Amon1
Templar
Templar
Crusader
Crusader
Dervish
Dervish
Dervish
Dervish
Dervish
Devout
min Choir
min Choir
Wrack
Vassal Mechanic
Free Vassal
Free Vassal
Free Covenant of Menoth
THEME: CREATORS MIGHT


I think Hark is generally going to be my Menoth drop, but I wanted to get practice with Butcher and see how he can play into Amon WITH the book.  Luckily Kell and eliminators can threat the book decently so I feel its at least a game.


He runs up in such a way that if I move up and shoot nearly any jack with Kell he can string it through shield guards onto the left templar that has enliven on it.  Templar on the left has fortify.  I move up as shown.  Staying out of threat range of everything except for one of butchers dogs.


Bryan decides to be conservative and tank up.  He contests the left flag with the fortified templar but does not contest the right flag.  Bryan admits after that that was a mistake.  I drop SoD from the middle Uhlans and put it on Ruin.  I send a fully loaded Ruin into the fortified templar and with some good dice he kills it outright.  One uhlan from the middle unit charges a the dervish behind the now dead templar but misses the boosted 8 and reforms into the flag. Right drakhun goes B2B with the flag to score.  Kell shoots some jacks and everything else moves up.   2-0 for me.


 (I took the picture before I moved the wardog within 3" of Butcher).  Bryan see's a chance to assassinate butcher who is only camping 2 focus.  I forgot about the side steps. but I still feel like butcher is pretty safe, baring some spiking.  So Bryan doesn't allocate anything, feats and casts all his spells, allocates all 7 focus.  He kills the uhlans on the left as well as Ruin and left eliminators getting his synergy chain up to 3.  I accidently leave my marauder within 10" of the crusader and it gets killed as well.

He charges a dervish at my drakhun, hits him twice (doesn't dismount) and the 2 side steps gets him into butcher.  However, he has to disengage the drakhun to make room for the second dervish, so the drakhun counter charges, does some damage and more importantly, gets out of charge range of the second dervish.  So he buys 2 attacks on butcher missing the first and doing 8pts of damage (3pts) to Butcher.   Templar goes into drakhun and dismounts him.


He has the book doing anti-magic so butcher has a limited area he can stand in and do his stuff.  Drakhun charges the fortified Templar and takes out his shield.  My eliminators also charge and combo strike but I do hardly any damage at all.  Butcher flashing blades the dervish in front of him and charges the front crusader.  He pulls in 2 dervishes and kills all 3.  Sitting on 5 focus after feat.  All my charge various things and do quite a bit of damage and gum things up to protect butcher.  But some crappy positioning on my part stops me from getting any uhlans on the damaged Templar.


Bryan kills 4 uhlans and 2 eliminators.  He moves the templar onto the left flag to bring the game to 2-1.  Fortunately for me all 3 of his lights are heavily damanged as is his templar.  Unfortunately Bryan had to go pick up his game so we have to cut the game short.  It seems like we're in a reletively even position so it would depend on how my next turn went.  Bryan said he felt that the game was mine.


Anyways, this seems like a pretty good matchup, with a bit of favour towards Amon assuming he has the book.  The three shield guards helps keep the book alive since Amon doesn't have a good way at removing Kell, perhaps with a WMM in the list as well it would do better.  Trying to position the eliminators so they can threaten the book is probably pretty important. 

His jacks hit like trucks with synergy and battle, and hit really high defense so whatever he gets to he can kill.  Need to use my speed and send my stuff in in waves.  Putting my marauder at 9.9" away from the crusader was a silly mistake.  I think Hark is still my Menoth drop, but it's good to know that Butcher is decent into Amon if need be (and he has RFP to have some game into High Reclaimer)

Thursday 19 January 2017

Battle Report #15 - Harkevich1 vs Haley2

January 19, 2017
Scenario: Recon
Opponent: Greg S
Initiative: Greg

Harkevich1 (Irusk proxy)
Kodiak
Kodiak
Kodiak
Juggernaut
Juggernaut
Marauder
Marauder
Joe
Max Winter Guard Infantry w/3 rockets
UA (Free)
THEME: WINTER GUARD KOMMAND

Haley2
Stormwall
Thorn
Squire (Free)
Max Lances
Min Lances
Laddermore
Junior (Free)
Firefly
THEME: STORM DIVISION


Another battle of the themes.  Greg is trying out the theme as a means to get more beef into his lists.  He loses out on Ragman, Anastasia and Rhupert, but gets way more brawn.  Lack of non-colossal pathfinder maybe an issue in the future tho.  We're both prepping for the LVO.


He TK's some models, TA's the stormwall and runs stuff up.  Shifting haley towards the right flag. Everything runs up and I trample the kodiaks up and make my cloud wall.  Hark 101.

(MISSING PICTURE)

Its to bad I forgot to take this picture.  Anyways.  Greg allocates 2 to the stormwall and TK's thorn and with the reaction drive it gets thorn into my cloud wall.  Stupid me should have built the wall over 5" away from Thorn, I knew he could do that and he was barely in.  Haley then TK's a kodiak into the clouds and TA's the stormwall and FEATS.  Stormwall charges and kills the kodiak, getting one swing into the other kodiak.  Thorn moves up disrupts the left most jack and gets some damage on him.  Lances all run into annoying positions staying outside of 1" on all my stuff.


His feat catches Hark, all my jacks and about half my WGI.  My marauder and juggernaut who were engaged by 2 lances both take free strikes at dice-10, the Eleap killing a winter guard they were also engaging.  Lances on the left are now unengaged.  my WGI remove both lances on the left and an aiming rocket rolls the hard 8 and kills the lance that was also in the middle trench.  Right most Kodiak takes a free strike from a lance and vents steam on another 2 lances on the right.  Boosts on both, kills one, leave the other on 1 box.  Hark moves up and is sitting on 5 focus.   Four storm lances killed on Haley's feat turn....not bad.


Haley loads up thorn and the stormwall.  Thorn TK's the remaining kodiak and tries to TK the right most juggernaut, but misses twice even with the reroll (couldn't boost). Haley moves to dominate the right flag.  Thorn pokes the left juggernaut disrupting him and bonks the marauder 3 times with his shield to knock out his cortex.  Lances move around and shoot/smack some stuff, killing more WGI.  Laddermore threads the needle between my 2 jacks on the left, and kills something like 6 WGI.  Stowmwall moves to protect haley and kills my kodiak on the right.


Joe gives attacks to WGI and shoots the pod to free up Hark.  Right marauder hits the 7 to combo slam Thorn into my objective.  Hark casts mobility and walks over to laddermore, and bonks her on the head, doing 5 pts and staggering her.  Middle juggernat moves around objective and finishes off thorn, repo'ing towards the trench.  Left maruader moves up and combo slams the firefly outta the zone and kills a lance.  WGI mini feat and spray down the middle lance to allow my juggernaut to walk towards his stormwall (taking 2 free strikes on the way).  I put some pts on his stormwall and repo into contest range.


Haley charges Juggernaut contesting, does some damage and TK's him away.  Stormwall moves out of range of my jacks, and finishes off the jugg.  One lance charges my middle juggernaut and the other kills 2 WGI.  Firefly moves in to contest and Jr runs out of the zone.  Haley goes to 2.


Hark casts mobility and takes a free strike from laddermore, luckily she misses.  Left Marauder slams the firefly and kills him and puts 8pts on the objective.  Right marauder kills contesting lance and repo's into contest range.  Kodiak walks into b2b with laddermore, dismounts and kills her.  This is where I make my game losing mistake (spoilers!).  Instead of moving the kodiak so he could punch laddermore and then reposition to touch the object and block LOS to Hark.....I don't even repo into b2b with hark?! Plus I dont even move the remaining WGI to block the lances charge on hark.  What the heck was I thinking!  Anyways, I go to 3pts.


As expected, greg has to kill or lose.  Lance charges hark doing a lot of damage.  Haley TA's stormwall and charges juggernaut and throws an arcane bolt into hark for more damage.  Stormwall moves and shoots hark with his big guns....in the back.  Dead Harkevich.


Man this was a really good game!  The shooting presence and advance move that the theme brings seems worth the loss of orin and ragman, its at least a very interesting choice.  By the end the game, it was mine to lose as I had every tool to keep Hark safe.  But better now than in a tournament!  Might have also been a good idea to instead of get the 3pts, get 2 and move hark towards my left flag as greg had hardly any pieces left to contest.  I need to somehow do better at protecting my WGI from electro leaps, he hardly put any attacks on them directly and still managed to wipe them all out.  This matchup (when Haley doesn't bring ragman) seems pretty even but will likely favour the player going first.

I will need to continue to test it, but it feels like even without orin, the benefits of the theme and the strength of the list give it solid game into cygnar.  Haley3 will still likely be problematic since Hark is the only source of magical attacks in the list, but perhaps I should change my objective from fuel cache to armory for the scenario dependent magic attacks.  Luckily my butcher3 list can also play into non-sloan cygnar if I find a matchup that I don't feel Hark can really play into.

Wednesday 18 January 2017

Battle Report #14: Harkevich vs Doomshaper2

January 18, 2017
Scenario: Recon
Opponent: Dan W
Initiative: Me

Harkevich1
Kodiak
Kodiak
Kodiak
Juggernaut
Juggernaut
Marauder
Marauder
Joe
Max Winter Guard Infantry w/3 rockets
Free UA
THEME: WINTER GUARD KOMMAND


Doomshaper2 ADR
Mulg
Mountain King
Mauler
Earthborn
Axer
Runebearer
Janissa
Whelps
min stone 
THEME:POWER OF DHUNIA


No pictures this time so I'll just give a brief overview of the game.  Once again, Dan's list is so fast and threats so far!   I wanted to see if Hark in theme could play into it.  Unfortunately I think doomy is advantaged a bit too much for comfort. 

I go first and blaze up the table, staying just out of his threat ranges (15" MK melee threat!)  He responds by running up just outta my threat.  I try to make a cloud wall that stays just outside of his feat walk and punch range, forcing him to either cast rush and feat to walk into my kodiaks, or feat and trample with rage.  He opts for the latter and kills a marauder, 2 kodiaks, cripples a third.   Ouch.


My first priority is killing the mountain king.  I try to move up and kill a couple stone guys to get the MK out of stone protection, but the 3 shots I take on the stone bearer, I don't even force a tough.  The rest of the winterguard fire at his mauler and a rocket goes into the MK.  The mountain king has probably taken 8pts so far.  I feat and get a fully loaded juggernaut and loaded marauder into him.  My dice are terrible with the marauder and leave the MK on 1 box!  I feel the MK HAS TO DIE, so I take 2 free strikes and get my final juggernaut into him, killing him on the charge, wasting 3 focus.  Perhaps I should have just killed the mauler like I planned, but I felt the MK was too big of a threat to leave fully functional, surrounded by whelps. 

That was the turning point, with the mauler still alive and my juggernaut banged up from taking a bunch of free strikes, he is able to get to much work done on his turn (even tho his earthborn and axer were full fury (but didn't frenzy!).  He grinds me out and my last ditch assassination attempt fails.


Thoughts.  I'm not sure what the best way to play into this game with Hark is.  Especially if he goes first.  Do I be really aggressive, cloud up and feat hoping he doesn't do enough?  Do I cloud up and stay much farther back?  The amount of damage he can do even from just trampling under Doomys feat is staggering.  I think Butcher3 is generally what I want to drop into trolls, and this convinces me further.  Even though with butcher the matchup isn't that great either.  Retalitory strike with wild aggression on mulg is terrifying and mulgs animus is rough on Butcher. 

Any thoughts would be appreciated.

Battle Report #13 - Harkevich1 vs Amon1

January 18, 2017
Scenario: The Pit
Opponent: Bryan Taylor
Initiative: Me

Harkevich1
Kodiak
Kodiak
Kodiak
Juggernaut
Juggernaut
Marauder
Marauder
Joe
Max Winter Guard Infantry w/3 rockets
Free UA
THEME: WINTER GUARD KOMMAND

Amon1
Templar
Templar
Crusader
Crusader
Dervish
Dervish
Dervish
Dervish
Dervish
Devout
min Choir
min Choir
Wrack
Vassal Mechanic
Free Vassal
Free Vassal
Free Covenant of Menoth
THEME: CREATORS MIGHT

Battle of the themes! Jack spam on jack spam.  Last time Bryan played the High Reclaimer into me and after that he felt that if he couldn't kill Harkevich, the cloud wall and armour hark brings is to much.


Turn 1 we both run up.  And man is Hark fast in theme.  My kodiaks are past the halfway mark top of 1!  Once again, lots of missing pictures :(.


End of my turn 2. I didn't need mobility so I load up 2 kodiaks and a maurader on the left.   The maurder charges the dervish on the left, boosts the combo slam and rams him into the building.  One more attack goes into him leaving him on 3.  Marauder repo's back.  One kodiak charges the templar that WAS besides the building and the dervish.  He did have fortify and enliven on him, but because of bad positioning on bryans part, i was able to pin him in with a charge.  Punch him at dice-7 a couple times and throw him into the wall.  Next Kodiak charges in doing more damage and throws him at a choir member further away, leaves it on 18 boxes.  The Blue and white templar in the picture is where the it ends up.  A rocket moves up, hits and kills a vassal that bryan accidently put within 20".  I create a cloud wall but didn't quite plan it out well enough as I leave 1 kodiak in sight.  Hark runs to the flag

(MISSING PICTURE)

With full synergy and d battle he kills the kodiak in sight and gets 2 fully loaded dervishes onto the left marauder and kills him as well.  He needs to feat to do so.  With side steps he also contests my flag with the broken dervish and a full one.  He contests with 3 heavies in a triangle, placing the fortified jack in front to stop me from throwing it out of the zone.


 (MISSING PICTURE)

Feat turn.  I load up a kodiak and 2 juggernauts.  My WGI, joe and hark kill the 2 contesting dervishes and shoot up the third south of the building, crippling its arms.  Kodiak kills a dervish blocking my juggernaut, juggernauts go in to finish off the fortified jack and kill the crusader.  I score 1.


Bryan is in trouble, to much armour and not enough jacks left to chew through it.  He leaves a kodiak on 3, and does some damage to my marauder knocking both its arms out.  Unfortunately the crusader had to trample to get in range though.  Bryan feels the game is pretty well over so to maximize damage, he allocates everything and gets the syngergy chain started with Amon, butting him in a risky position.


I load up my jacks that have cortex's.  The kodiak damages the templar and the juggernaut finishes it off with its charge.  With his 3 remaining focus he boosts his fist and buys and boosts an ice axe into amon, killing him. 


Bryan is still learning Menoth and in time he'll be quite skilled.  He did very well in mk2 with both cryx and khador.  He made some mistakes by not effectively using enliven and boxing in his templar turn 1.  His list struggles with the cloud walls, but at full synergy, his crusaders hit at even dice against my feated jacks.  It's crazy.  This is a game of positioning, enliven and effective cloud walls.  The list probably favours Hark slightly, especially with in theme with the extra move turn 1, but amon definitely has game into it.


Battle Report #12 - Butcher3 vs Vlad2

January 18, 2017
Scenario: Incursion
Opponent: Vann K
Initiative: Vann

Butcher3
Wardog
Ruin
Marauder
Min Uhlans
Min Uhlans
Eliminators
Eliminators
Drakhun
Drakhun
Orin
Kell
Bokur (c:Butcher)

Vlad2
Sylys
Kodiak
Grolar
IFP + UA
Eliminators
Eliminators
Greylord Ternions
Drakhun
Manhunter
Manhunter
Yuri
IF Kovnik
IF Kovnik


Vann was trying this list out for the first time, it was designed as a wormwood drop with tons strong feat targets.  A couple proxies (Ruin = Grolar. Valachev, Greylord Escort & Harlan = Ternions. Great Bear = IF Kovnik).  I'm missing quite a few pictures but will try to make due.


Bottom of 1, end of my first turn.  We both move up as shown.  Kell is able to aim and put 6pts onto the drakhun.


(MISSING PICTURE)

Vann's drakhun charges my yellow eliminators, killing 1 and missing the impact attack on the other, (I forget to counter charge).  His eliminators move up, I counter charge one and kill it.  His front manhunter charges my centre uhlans, but terrible dice leaves the uhlan alive.  He moves his grolar (ruin) out of LOS of my left uhlans but in side of my central uhlans, hoping the manhunter will tie them up.  His IFP mini feat and run up.


My eliminators clear out the jamming manhunter.  My central uhlans (with SoD) charge his grolar and leave it on about 8 boxes.  Kell and Ruin kill the 5 contesting IFP.  Bokur and Drakhun kill his drakhun and orin leaps a chain lightening off my drakhun to kill his other eiminator.  Butcher runs up as do everything else as shown.  I score 3.
(MISSING PICTURE)

Vann Feats, throws my marauder, kills both dogs, puts a lot of damage on Ruin and kills some uhlans.  But he doesn't contest enough and between my left drakhun, 2 uhlans and butcher himself I'm able to clear both flanking flags without much difficulty.


Final game state (besides the IFK that butcher killed).

Not much to say about this game.  Vlad2 is very versatile with tons of threats due to his feat and arcane might.  Vann had never played Vlad2 so he wasn't very proficient with the list, but in time it will come.  I am still liking the butcher list.  In Mk3 threat ranges are extremely important with premeasuring, and with a ton of 12-13" charges in the list, the list threatens pretty well.

Monday 16 January 2017

Battle Report #11 - Vlad1 vs Haley3

January 16, 2017
Scenario: The Pit
Opponent: Greg S
Initiative: Me


Vlad1
Marauder
Marauder
Marauder
Kodiak
Min rifles w/3 Rockets
Joe
Mortar (Free)
Mortar (Free)
Field Gun (Free)
THEME: Winter Guard Kommand

Haley3
Thorn
Grenadier
Grenadier
Ironclad
Max Trenchers
Max Storm Lances
Jr w/ Charger
Ragman
Rhupert


End of my turn.  This terrain is terrible, I thought going first would be best to set up my gun line, but it was a huge mistake.  I should have taken the better side and scored first.  Anyways, a unit of rifles flank hard up each side around the terrain.  Everything else runs up.  Mortars advance and shoot, getting a lucky swatter forward killing 2 trenchers (and toughing 1) and putting 6pts on a grenadier!

(MISSING PICTURE)

His first turn is pretty uneventful. He moves up his grenadiers, puts a couple points on a marauder and a scatter kills a riflemen behind the right building.  Trenchers cloud up, but because of the trenchers that died, he can't make an unbroken wall, leaving a small space where Baby Haley is standing in the next photo.


Vlad moves up to get on the flag, he casts SnP and feats.  Kodiak tramples through the clouds and buys attacks on the grenadier, leaving it on 2 boxes, the steam kills the trenchers on either side.  Both Mortars shoot my kodiak in the back, one scatters and kills the grenadier, the other toughs a trencher.  Winter guard move up as shown.  Terrain and clouds are really hindering the gunline.


I had tried to position my stuff so that contesting would be very difficult, I forgot ghostwalk allows him to move through obstacles.  With ragman, his ironclad plus some shooting take out my kodiak.  Haley casts Distortion and moves onto the flag.  Baby Haley goes into the zone, Grandma puts, ghost walk on lances.  Lances run and charge, killing a couple riflemen on my right side and put some points on a marauder.  Thorn gets LOS to my mauraders with a reaction drive move and disrupts both. 


He scores 1, and due to a bit of mistaken positions, contesting is going to be difficult, silly me.  But I see an opportunity.  Vlad casts SnP, charges the stormlance into the zone, kills it then and blood boons a razor wind into Baby Haley.  Needing a boosted 11 under SnP, but I miss, sad face.  Zone isn't getting cleared, I'm in scenario trouble now.  Oh well.  One marauder combo slams thorn into a lance.  Shooting kills thorn and the other marauder kills the last remaining lance in the zone.  Rifle corp continue to flank, but i don't contest.

(MISSING PICTURE)

Ironclad and ragman move in and kill a marauder.  Haley feats, casts Distortion and revives some lances.  Lances charge in kill some more rifles and tie up some more.


Greg scores again, 3-0.  I'm in big trouble, need to do something drastic.  Vlad BoK's himself and charges Baby Haley, trying to kill her, then blood boon a razer wind into grandma haley.  But I keep missing the boosted 8 to hit baby haley, so that fails. Some other stuff happens but next turn he's able to quake hammer his grenadier to knock vlad down and then kill him with baby haley.


This is a bit of a tough match for Vlad I think.  If I can't get to his trenchers, he can protect his army from shooting/charges and can dictate the engagement.  His defense is also a bit of a problem, especially when I don't play with Joe. I forgot to deploy him and figured I'd experiment to see how the list plays without him.  Against this list, the +2 would have been very effective...obviously.  Signs and Portents can only do so much.

I got pretty luck top of 1 with my mortar killing 2 trenchers to disrupt his cloud wall.  The pit is probably also not great for vlad to try to fight haley3 into.  And I have to be very mindful of terrain.  It can make or break any match up with this many guns.  Need to keep working on moving and positioning this many guns as well, I spend too many turns not doing much.

Saturday 14 January 2017

Battle Report #10 - Butcher3 vs Fiona1 (Or more like, the rant on WINTER GUARD KOMMAND

January 13, 2017
Scenario: Incursion
Opponent: Carolyn W
Initiative: Carolyn


Butcher3
Ruin
Marauder
Marauder
Min rifles w/3 Rockets
Joe
Mortar (Free)
Mortar (Free)
Field Gun (Free)
THEME: Winter Guard Kommand

Fiona1
Galleon
Buccaneer
Max Sea dogs w/3 rifles
Max Press gangers
Devils Shadow
Rockbottom
Killingsworth
Grogspar
Hawk


Carolyn was very inexperienced, and unfortunately I only brought the Butcher list to try out and I was the only one to play her, so she got the rocket spam.  It was a very one-sided even tho I tried to help her out, gave her some jacks to kill so she had some fun, but I still tabled her.  Instead of writing about the specific game, I figured I'd write my thoughts about the new theme and this list in particular.

So I've been trying to find a pair for my 7 jack Harkevich (which may also go in theme) and I think rocket spam might be the way to go (I had been working on a vlad1 list with 12 rockets before the theme dropped).  Vlad1 is the obvious choice for the rocket spam, SnP every turn is of course amazing, and having the threat of the 12-14" threat jacks is also a powerful question to ask.  I may very well end up with Vlad in the end.

So why Butcher3?  It's true he does nothing for the rockets and Joe can only be in one place at a time.  The plan is to use the combo-smite from the mauraders and the field gun to knock down hard targets for the rockets to unload on.  The rifles use CRA's to take care of infantry or softer targets and the mortars lob shots of opportunity.

So again, why Butcher3?  My theory is with Sac Pawn Butcher can pretty aggressive.  He doesn't have to worry about Eiryss stripping his focus or being shot to death by lots of boostable guns.  With the 4" move at the beginning and energizer for extra distance, I can use the marauders to be upfront, forcing the enemy to deal with them. The enemy will need to close with my army, else the rifle corp will slowly whittle them away.  But they have to respect the 12-15" area of death around Butcher.   The list also brings magical weapons which if I went with Vlad, both my lists would have almost none.   So the list asks 3 questions.  Can you deal with all the rifles and rockets?  Can you deal with 3 Khador heavies that threaten 10"-13?  And finally, can you deal with Butcher himself?  Butcher also gives an answer to vyros2 in theme with imperatus and 10 griffons.  With that many shield guards, Vyros can spread the damage around too much for vlad to deal with, and even with my marauders getting the alpha, I think they just get wrecked in response.  And then theirs haley3 or any mass incorporeal, without Butcher, I can't deal with the incorp.  Maybe I worry to much about the corner case tho.

Anyways, going second and maneuvering this many ranged models around is difficult.  It will take a lot of practice to get proficient at it.  In certain matchups, such as one with lots of AOE's, correct spacing will be key and knowing when to hold models back so that I don't lose them trivially the following turn, even if that means they don't get to shoot.  The range threat is strong however.  The list shot the galleon off the table from full (although it took nearly every gun in my army to do it), and having Butcher as an anchor seems like a great base for the list.  However, trying to hit def 12+ is pretty sketchy with rockets if you don't knock the target down, this is where SnP really comes in (not to mention the damage).  But I also worry that even with SnP, its going to be difficult to keep all the rockets in control, with butcher they are completely caster independent, which does have some flexibilty.

I'll have to continue to test, I'd like to get 15 games in with the rocket spam list (B3 or vlad) before the LVO.  Enough of this rant, I'm tired.  Goodnight.

Wednesday 11 January 2017

Battle Report #9: Harkevich1 vs High Reclaimer1

January 11, 2017
Scenario: Incursion
Opponent: Bryan Taylor
Initiative: Bryan

Harkevich1
Kodiak
Kodiak
Kodiak
Juggernaut
Juggernaut
Marauder
Marauder
Ogrun Bokur (c: Harkevich)
Ogrun Bokur (c: Ragman)
Ragman
Orin Midwinter

High Reclaimer1
Scourge of Heresy
Reckoner
Knights Exemplar
Max Vengers
Max Idrians + CA
Rhoven and co.
Min Cleansers + CA
Min Choir


Ok so there's a lot of proxies in this report but I remembered pictures again. My models are out being painted and Bryan just bought a bunch:


Here's the proxy legend:
Winter guard infantry = Idrians
Storm knights = Vengers
Ternion + IF Kovniks = Rhoven & co.
Risen = ChoirRockbottom = Cleanser CA
Templar = Scourge of Heresy
Large bases with Khador jack pictures on them

End of Round 1.  I run up, he runs ups.  His Idrians advance and shoot the prey'd Kodiak (shield wall token kodiak). He does something like 16pts doing 2 man CRA's with Hof.

(Forgot picture)

Hark casts mobility, moves up and shoots an Idrian. Kodiaks tample up and make a cloud wall spanning from the forest on the left to almost the house on the right.  Maurader on the left charges venger closest to him and such an angle that the combo slam slams him into the leader.  Killing the charge target and knocking the other down.  Other stuff moves up


The standing vengers charge the maruader which was right beside the house, as does the reckoner.  I could have moved hark a little to the left and put the maurader out of LOS of the reckoner, oh well, dead marauder.  Idrians move up and shot my juggernaut, as do the cleansers.  About 9 damage is done.  Other stuff moves up.


It's feat turn!  Ragman moves up so that dark shroud will be applied to the templar.  Full kodiak charges into templar, hits it twice, throws it into the building and continues to beat on it.  My dice are terrible tho and leave it on 9.  Other kodiak charges it to finish it off instead of fighting vengers.  Orin, and kodiak kill some Idrians, juggernaut tramples the rest, finishing off the unit and buys a couple attacks into Scourge.  Decent damage on Scourge and I hit the crit so he's stationary.  Marauder kills 3 cleaners then repo's back to the flag to score.  Silly me doesn't repo the kodiak onto the flag

(Couple missing pictures)

1-0.  Bryan is in a rough spot and reponds by trying to do damage to my jacks, not much is done.  I respond by killing all but 1 vengers (mistake on my part leave the last one alive) and I kill some exemplar as well as Rhoven and co. I run Harkevich away but do it haphazardly not respecting the crazy threat range of HR.  I also score a flag.


2-0.  Bryan has his feat for a last ditch assassination run, he is far to down on attrition.  He is able to get one exemplar onto Hark as well as 2 HoF'd Vengers.  But Hark is camping 3 and Hark lives with lots of life to spare.  I kill HR.

Not to much to say about this matchup.  Bryan made a mistake by letting me kill all the Idrians, if he held one back his assassination would have had more attacks.   However, the amount of armour and clouds I bring HR can't really deal with effectively (it's possible Bryan didn't leverage the Exemplar well enough, perhaps they can tip the scale). The match should be in Hark favour if and ONLY IF I can keep Hark safe.  That is what this match hinges on and it will likely be difficult to keep him safe against a cagey opponent.

Battle Report #8: Butcher3 vs High Reclaimer1

January 11, 2017
Scenario: Incursion
Opponent: Bryan Taylor
Initiative: Bryan

Butcher3
Ruin
Marauder
Rager
Min Uhlans
Min Uhlans
Eliminators
Eliminators
Drakhun
Ragman
Kell
Alexia2

High Reclaimer1
Scourge of Heresy
Reckoner
Knights Exemplar
Max Vengers
Max Idrians + CA
Rhoven and co.
Min Cleansers + CA
Min Choir


Ok so there's a lot of proxies in this report but I actually remembered pictures this time! My models are out being painted and Bryan just bought a bunch:


Here's the proxy legend:
Winter guard infantry = Idrians
Storm knights = Vengers
Ternion + IF Kovniks = Rhoven & co.
Risen = ChoirRockbottom = Cleanser CA
Templar = Scourge of Heresy
Greylord outrider = Uhlan leader


End of round 1. Butcher casts energizer and everything charges and runs up. I try to use uhlans to tie up idrians. Probably shouldn't have used the unit that was their prey.... Alexia move up, hits a def 17 idrian with a hellfire, removes it from play, and repo's back.


In response, the HoF'd idrians kill the 2 engaging uhlans and shoot the third, killing the unit and shifting prey to the drakhun to which he also shot and put 5pts on. The rest of his stuff run around as shown.

Time to get work done. Butcher puts silence of death onto himself, charges up, engergizes into position and pulls almost all the idrians and removes them all from play. He also kills scourge but due to slightly bad positioning, the reckoner is a tiny bit out of range. I have to feat to kill scourge and I end up sitting on 3. Ruin gets a soul from a venger and chargers the reckoner, knocking everyting out except for his cortex and right arm, uh oh.... Alexia moves up to deny souls from the errants that my eliminators kill to score the flag. HR only gets 2 souls the entire turn.


Bryan needs to kill me or lose. Cleanser aim and blast butcher, bryans dice are on fire! They burn through 2 of my focus and put 4pts of damage on top of that. HR feats back Exemplars, puts them into position to walk into butcher, and puts HoF on them. HR walks into butcher (6.9” away!) and puts another 5 or so pts of damage on him. He gets 3 Exemplar onto butcher (drakhun counter charged and killed 2) but his dice arn't great and leave butcher on 7. But reckoner gets the job done and puts butcher into the dirt.

Butcher has game and tools into HR, but i definitely underestimate his assassination potential. Even if I had killed the reckoner, which with better positioning I think I could have, he still has a decent chance of killing Butcher. Silence of death is money in this match, as is being able to deny HR souls with good placement of Ruin and Alexia. Going first is probably good against HR as well. Matchup probably isn't favoured to much one way or another

Tuesday 10 January 2017

Battle Report #7: Harkevich1 vs Una2

January 10, 2017
Scenario: Line Breaker
Opponent: Idavoll H
Initiative: Idavoll


Harkevich1
Kodiak
Kodiak
Kodiak
Juggernaut
Juggernaut
Marauder
Marauder
Ogrun Bokur (c: Harkevich)
Ogrun Bokur (c: Ragman)
Ragman
Orin Midwinter


Una2
Wilder
Gorax
Scarsfell
Scarsfell
Scarsfell
Scarsfell
Scarsfell
Scarsfell
Scarsfell
Scarsfell
Scarsfell
Shifting Stones
Shifting Stones
Sentry Stones
Sentry Stones
Blackclad

Idavoll proxied this list so I could get experience against Una2. I wanted it to be a worse case scenerio so we dropped the pieces that don't do much against my list (like the pureblood) for more Scarsfell. Also gave him first turn to see what its like going second against her. Since it was his first time playing her, and we were trying to see how the matchup played, we played pretty loose with some take backs and such. Because of this I'm not going to do much of a battle report and instead focus on the matchup in general.

I knew how hard the griffons hit but seeing it play out was still eye opening. Their damage output is absolutely ridiculous. The game ended with him getting a single primal'd griffon into hark and running another griffon in for flank. Hark was sitting on 4 focus, and under feat so arm 19. Two griffons benefiting from flank can kill a jack outside of feat turn.

Under Una's feat, my list does have some methods to deal damage. Orin shooting a friendly jack and then boosting on the griffons gets some good damage on. As does the boostable vent steams. Applying ragman to any of this damage is just gravy. It can reliably kill 1-2 griffons through Una's feat turn depending on positioning.

Harks cloudwall is quite beneficial. Staying just within 10” of the front griffons, but outside of 9.5” with clouds is ideal if possible. That way even under feat the griffons cannot walk into my jacks and my jacks threaten his griffons. Save Harks feat for the turn after Una's feat if at all possible.

Keeping Hark safe is paramount to this matchup. Need to remember about thunderbolt. Fishing for the crit with thunderbolt allowed Una to knock down my jack blocking LOS, and push hark away so he doesn't benefit from Iron sentinel. This also allowed Una to get the griffon in which killed Hark. Blocking landing zones for griffons is important to keep hark safe as well.

This matchup is favoured for Una, but not crushingly so. And the more common builds with a pureblood and only 6 or 7 griffons is better for hark. Will need some more practice against her.

Sunday 8 January 2017

Battle Report #6: Butcher3 vs Issyria1

January 8, 2017
Scenario: Entrenched
Opponent: Kevin B
Initiative: Kevin

Butcher3
Ruin
Marauder
Rager
Min Uhlans
Min Uhlans
Eliminators
Eliminators
Drakhun
Ragman
Kell
Alexia2

Issyria
Hyperion
Chimera
Max Sentinals + UA
Max MHSF + UA
Max MHSF
Arcanist


Yay! Pictures......BUUUUUT only 2.  Bow before the glory of my proxies! And his hyperion popped off the base.  Probably good I didn't take too many pictures.  Kevin is just getting back into the game after a break, so we played a pretty loose game

-He runs up, I run up as shown

-Butcher is camping 2 and Kevin goes into the tank debating an assassination
-Issyria feats casts blinding light through his chimera, he moves up his AD MHSF and puts 8 shots into butcher at dice-8.  He only does 4 pts of damage and I don't spend butcher's focus
-Kevin abandons his assassination plan and instead focuses the rest of his shots (MHSF and Hyperion) to remove the marauder

-Butcher uses his vengeance move to move up, cast impending, kill 4 MHSF then advances backwards out of hyperions melee threat range.
-One unit of eliminators charge his sentinels, killed 4 and tying up another 3, Uhlans kill chimera and reposition onto the flag to score
-Ruin and Alexia get fueled up on souls, but silly me forgets to put either of them near butcher
-Other uhlans and eliminators kill more MHSF

-Butcher is camping 2, and I forget about vengeance on the sentinels...uh oh
-I also forget Issyria has flight so with only 1 velocity move, she can get into range to blinding light butcher and she casts crusaders call
-Hyperion moves up and shoots butcher and gets a couple more points on him
-With his vengeance and crusaders call he his able to get 4 sentinels onto butcher.  All hit and no tough.

Sad Butcher :(  (I moved a red eliminator before taking the picture, she was farther up the board)


-I easily could have kept butcher safe with better placement, but good on Kevin for capitalizing especially with only a few minutes left on his clock (lot of tank time).  Otherwise I was in a pretty spot
-Drakhun is great for tying up and kill MHSF and eliminators are amazing at doing the same to sentinels
-Need to work on better side steps to maximize jam potential
-Also need to make sure eliminators survive his feat turn so they can take care of the sentinels
-Perhaps putting them behind uhlans so the opponent at least need to kill 1-2 cav models before they can get los to the elims
-Issyria's assassination needs to be respected, the feat plus all her shooting is surprisingly dangerous, even to Butcher, I definitely did not respect it this game
-Ruin will be important for knocking off Inviolable Resolve, either off the sentinels so butcher can drag them in, or off Hyperion so he's only arm 19
-Should try to set up a situation that butcher goes in to finish off hyperion and then feats to stay safe from sentinels

-I'm liking Butcher as a ret drop so far (1 game deep), the list seems decent so far, Kevin mentioned how difficult his list has at removing cavalry from range, so the double min uhlans might be good to keep. Kevin is going to replace one MHSF unit with Invictors, this will give him better game into my cav, hopefully we can play the matchup again soon  Will continue to test the list


Battle Report #5: Harkevich1 vs Darius1

January 8, 2017
Scenario: Outlast
Opponent: Greg S
Initiative: Me

Harkevich1
Kodiak
Kodiak
Kodiak
Juggernaut
Juggernaut
Marauder
Marauder
Ogrun Bokur (c: Harkevich)
Ogrun Bokur (c: Ragman)
Ragman
Orin Midwinter

Darius1
Sylys
Centurion
Centurion
Stormclad
Stormclad
Jr Warcaster
Sentinel
Ragman
Laddermore
Strangeways
Tinker


-This game was pretty straight forward
-I run up, he runs up
-I notice ragman is killable, I allocate all my focus and cast mobility
-He has nothing in charge range since the centurions have polarity field up
-I run or trample all my jacks forward, buying attacks on a stormclad to get the damage train started
-Orin moves up, zaps a kodiak in the back, because so much of his stuff is electric immune, the closest model is ragman, so I boost and kill rags
-He tries to fight back, but without ragman and subpar dice he only wrecks half a kodiak
-I move my ragman into position and remove three of his heavies
-Greg concedes

-We re-rack and try to have a fast game before the store closes an hour later, he goes first this time to change things up
-He runs up, I run up
-This time he keeps ragman way back, realizing that with crane, ragman can affect an enemy model just under 15" away
-I want to save my feat so I try to stay out his threat range but have to put something in the zone
-He responds by killing the jack in the zone and refuges away, moving darius into the zone
-Very bad play by me, he gets 2pts, a free jack and once again, nothing is in my threat range, stupid me
-He shifts his other jacks towards the zone he dominated
-Now I feat and throw my jacks at him, but can only trample, but with ragman and 3 jacks he's able to do alot of damage
-he doesn't score but does a lot of damage and I lose ragman to silly placement.  I have no assassination vector, he has all 4 heavies and the store is closing, I concede


-Sorry, no pictures again, why do I even try?
-Darius with double centurion is a tough matchup for Harkevich I feel, at least in this scenario, especially if Hark goes second
-Darius can get around the cloud wall by running or tramping followed by a lot of jack hammers
-The arm23 and arm24 centurions that can't be charged are incredibly difficult to deal with without Ruin (even with ruin they are no walk in the park)
-using crane, his ragman has a ~15" application of his debuff
-If I can kill ragman before I use my feat, I'm in good shape, if not I think Hark needs to spread his jacks so Darius can only apply dark shroud to a few of my jacks
-Need to keep juggernauts safe, they are the most important in this matchup
-I also need to work hard to keep ragman safe, need to be wary of the d3 leaps from laddermore
-I think this build of Darius is favoured against my build of Hark

Friday 6 January 2017

Battle Report #4: Butcher3 vs Doomshaper2

January 6, 2017
Scenario: Outlast
Opponent: Dan W
Initiative: Dan

Butcher3
Ruin
Marauder
Rager
Min Uhlans
Min Uhlans
Eliminators
Eliminators
Drakhun
Ragman
Kell
Alexia2

Doomshaper2 (ADR) - Power of Dhunia
Mulg
Mountain King
Mauler
Earthborn
Axer
Runebearer
Janissa
Whelps
min stone


-Scenario victory, attrition advantage
-Once again, I forget pictures
-He runs up, I run up.  He moves up the MK spraying 2 cav and primal shocking another, luckily, he only kills 1.  He kills alexia with a primal shock coming from the earthborn, rolling the needed 14.
-I send in 5 uhlans and a SoD'd ruin and leave the Mountain King on a handful of boxes.  Dan forget to check Ruins threat range when he moved up to spray and primal shock some stuff, but it worked out in his favour as the MK survived
-I lose ruin and all 5 remaining cav in response, Dan feats to send mulg in to kill 2 eliminators and ragman in opposite zone
-I kill the MK with elims, drakhun and kell.  Butcher clears the other zone (needing to feat to kill mulg and cast an obliteration to kill whelps).  I score 2 and because of a building placement, it will be difficult for dan to get something meaningful in to contest/threaten butcher now.
-We fight back and forth but due to the strength of Butcher I get up on attrition and score my last three
 
-Dan feated too early, if he had kept Mulg toe'd in the zone, saving his feat it would have been much more dangerous to get butcher to get into the zone and be relevent
-His list is extremely fast.  With a 15" threat on the MK and 14" on Mulg, even with ruin and all my cav he out threats me
-If he goes first he can rush all his heavies and get way up the board, guaranteeing him the alpha, and with sprays and primal shock I have to put a heavy in his face, not cav, otherwise he can zap my cav while staying far enough back
-Might be worth sacrificing ruin as bait since the marauder hits like a truck against the MK
-Have to be careful with wild aggression on mulg with his retaliatory strike, its a ~40% chance that he will crit butcher if butcher goes in on him
-This matchup is probably not favoured too heavily one way or another

-Working on finding a pair for Harkevich.  Butcher3 seems to be a good fit, however I'm not sure about this list
-It's fun and its fast, but to boostable shooting or magic the cav probably wont last long.  Will continue to test

Wednesday 4 January 2017

Battle Report #3: Harkevich1 vs Baldur1

January 4, 2017
Scenario: Extraction
Opponent: Idovall Heimdall
Initiative: Me

Harkevich1
Kodiak
Kodiak
Kodiak
Juggernaut
Juggernaut
Marauder
Marauder
Ogrun Bokur (c: Harkevich)
Ogrun Bokur (c: Ragman)
Ragman
Orin Midwinter

Baldur1
Pureblood
Megalith
Woldwarden
Woldwyrd
Woldwyrd
Sentry Stones
Sentry Stones
Shifting Stones
Shifting Stones
Skinwalkers + UA

-Clock Victory, attrition disadvantage.
-He was slowly grinding me out and was soon going to start out scoring me
-His list hits hard between megalith and the skinwalkers (cycling stone skin) and he can use his feat to deny me the alpha while standing quite close
-He can also place a forest to deny LOS
-Hard to protect ragman and orin with all his boosted sprays, the bokurs only last so long
-Need to be very conservative with the placement of ragman, deathfield is crucial
-Orin is also important to stop geomancing earth spikes scalpeling  out ragman
-Need more practice against circle in general, their angles are very difficult to stop/predict against a skilled player


Battle Report #2: Harkevich1 vs Amon1

January 4, 2017
Scenario: The Pit
Opponent: Bryan Taylor
Initiative: Me

Harkevich1
Kodiak
Kodiak
Kodiak
Juggernaut
Juggernaut
Marauder
Marauder
Ogrun Bokur (c: Harkevich)
Ogrun Bokur (c: Ragman)
Ragman
Orin Midwinter

Amon1
Templar
Templar
Dervish
Dervish
Dervish
Dervish
Dervish
Dervish
Dervish
Devout
min Choir
min Choir
Wrack
Anastasia
Kicky Monk


-Scenario Victory and attrition advantage
-I was able to sit on my flag and box him out of scenario after I killed Anastasia and the monk as they were his only mobile models
-Amon's jacks hits very hard, getting an easy +5 swing to their pow, can get to even dice or dice-1 (jack dependent) even on Harks feat turn
- Amon has no way around the cloud wall unless he can spread way out.  This should allow Hark to get into position with clouds then feat the the following turn AND get the alpha
-As always, work hard to keep Ragman alive.  Against Amon, with good use of reposition should be able to keep Ragman alive and death fielding for 2 rounds
-Make sure to save juggernauts for the heavies, send kodiaks and marauders into the dervishes
-Vent steam is great for dealing with kicky monks
-Going first is very beneficial.  If Hark goes first, matchup is likely favoured decently.  Much closer to even if Amon goes first